Tuesday, June 10, 2014

Expecting the Unexpected

Learning to expect the unexpected has been the hardest lesson for me to learn after my husband joined the Army. I'm a bit of a planner and not a huge fan of surprises, but overall I think I have handled all of the twists and turns fairly well.

In the less than three years my husband has been in, I've made it through basic training, AIT, a 5 month deployment to Afghanistan, a PCS, a 1 month TDY while 8 months pregnant, a 2 month TDY with a 2 month old, and another 2 month TDY which my husband just returned from a month ago.  Did I mention I also have a full-time job in accounting to balance this all with as well?

When my husband returned home last month, he mentioned several times that he does not foresee any travel for work on the radar for at least the next year.  The next big training course he could be slated for requires he get a little more experience under his belt and likely wouldn't be suggested until next year.  And the unit was not looking at any deployments given the draw-down in Afghanistan.

He jinxed it.

First, we were informed last week my husband is now going on a two week TDY next month.  Okay, that's not too bad, especially considering he'll be heading to a base that's within driving distance.  So if he's approved to bring a POV, he'll be able to come home over the weekend that falls in the middle of the course.  And if he cannot bring our car, it's just two weeks.  No biggie.

At the end of the week, he learned that they want to send a group of 10-15 soldiers on a deployment later this year.  Rumor has it, it would likely last for about 4 months.  He didn't think he'd be as likely to be selected, but he told me about it so I could be prepared for the possibility.  He then learned yesterday that he has one of the longest dwell times out of the unit, so there is a really good chance he could be chosen.  Given how much he has been away this past year, he has already said that he will definitely not volunteer to deploy.  However, if not enough people volunteer, there's a good chance he will be deploying again.  Oh and that 4 month time-frame?  Apparently just a rumor and no real length of time has been decided.

While I obviously do not want to deal with another deployment this soon, I really hope they will settle the who & the how long rather soon so we can be prepared.

Thursday, June 5, 2014

The Big ONE: Banner

Last week, while spending time browsing through Pinterest, I saw a couple cute Happy Birthday banners that I liked. However, with my daughter's birthday now less than three weeks away, I knew I likely wouldn't have time to order one from Etsy and guarantee it would arrive in time unless I paid for a rush delivery. So like I did with Abby's tutu, I decided to make her banner as well!

I gathered ideas from various pins and Etsy listings, making note of various elements I liked from various designs. This past weekend I picked up some sheets of card stock in the party colors (50% off the regular price, too!) and began work on the project.


I purchased several sheets of blue, purple, green, pink, and white card stock. I cut one sheet of each color into 4" squares, and then cut a few sheets of my white paper into 3" squares, on which my letters will then be attached.


While deciding how much of a colored border I wanted, I simply cut some 3" & 3.5" squares of regular printer paper to visualize, before ultimately decided I liked the look of the 3" the best.

Next, I glued my white squares onto my colored ones.


For my letters, I wanted bright, block lettering that would really pop from the background.  I printed out the letters needed to spell out Happy Birthday Abbigail onto some white cardstock and then cut them out to use as a template.  After my letters were cut out, I then traced them onto the bright pink cardstock I purchased and cut out each letter (I'm a bad blogger and did not capture photos of these steps, I apologize).

In order to help make the letters pop and provide dimension to the banner, I used a roll of foam double-sided tape to adhere the letters to the background, just to add a little depth.  The next step for me was to then "hang" the banners and ribbon to the wall.


While I had intended to actually thread the ribbon through the squares, I decided to go for an easier approach and first attached the ribbon to the wall with some mounting putty, following behind with each letter square over the ribbon to give a banner effect, without having to worry about actually attaching my squares to the ribbons.

Tuesday, June 3, 2014

The Big ONE: Birthday Outfit

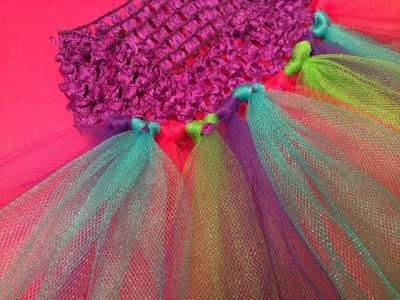
When I began reviewing items on Pinterest to start coming up with ideas for Abby's birthday, I quickly decided I wanted her to wear a tutu for the big day. When I saw that many are going on Etsy for $30+, I thought I would look into making my own to help save money.

After a quick Google search, I found this online tutorial on how to quickly make a no-sew tutu. It looked so simple, so I picked up my supplies at Hobby Lobby so I could get to work on it. Hobby Lobby and Michael's both regularly have 40% off coupons available, so it makes these types of craft projects more economical/enjoyable.

The supplies for this project are pretty minimal. You need a crocheted headband, which will serve as the tutu's waistband, rolls of tulle, scissors, and a ruler or tape measure. Other useful items to have to make cutting the tulle easier are a piece of cardboard, cut to either the length you want the tutu, or twice the length, as well as some rubber bands.

While you can simply cut pieces of tulle one at a time, per the video I linked above, there is a much easier and more time-efficient way to do so. That's where the cardboard comes into play.

You'll use the cardboard to wrap your tulle around. I found it easier when getting started if I used one rubber band to help hold my beginning piece in place.


Once you have the edge of your tulle lined up with the edge of your cardboard, you'll continue to wrap the tulle around. You can either do this until you go through the entire roll, or just until you have wrapped around the number of pieces you need for your skirt.


If you cut the cardboard equal to the length you want your tutu to be (as I did here) then every full wrap around (front & back) will equal one strip of tulle. If you cut the cardboard equal to twice the length of your tutu, then every full wrap around will get you two strips of tulle.


Once you're done wrapping your tulle, you will want to place a rubber band or two around the whole thing to help keep the fabric in place when cutting.

Next you'll be cutting. If your cardboard is the length of your tutu, you'll make just one cut, along the edge where you lined up the beginning of the roll. If your cardboard is twice the length of your tutu, you'll make two cuts, one along both edges.


When cutting, be sure not to pull too much with your scissors or to veer towards one side or the other in order to keep your tulle lengths as close to even as possible.

Once you're done, you can remove the rubber bands and you'll be left with a neat stack of tulle.


Complete this process again as many times as needed for each color you're using. I am using four colors for my daughter's tutu, so I completed this four times.


Once you have all of your tulle ready to go, you'll simply follow the directions outlined in the video for tying the strips to your headband.

You'll grab a piece of tulle, gather it and fold it in half, then thread the loop through the back of one of the holes on the headband. You'll then pull the ends through the loop on the front side and pull down to create your knot.


Keep going around until you have made a full circle around the length of the headband, and before you know it your tutu will be complete!


I just did one layer of tulle and used the second row of holes (rather than the very bottom row) on the headband to provide a little more strength. And if you want a fuller skirt, you can circle back around with a second row.

This is such an easy project, I created two of these for my daughter. One will be used in the next week for her smash cake photo shoot, and the other will be worn at her party.